Baked Veggies and Goat Cheese

0
COM

My first clean meal! Exciting right? Actually, this is a meal I have made many times and in many different ways, but this was the first time I made it Clean. It is quite delicious and very simple. You could use all sorts of vegetables, I used what I had on hand.

According to the research I have done, clean eating is all about balance. Combine a carb and a protein with some vegetables and you are set!

Vegetable: Broccoli, bell pepper, leek, carrot
Carb: Potato
Protein: Cheese


Prep Time: 15 minutes
Cook Time: 60 minutes
Serves: 3 people

Ingredients:
  • 4 small red potatoes chopped
  • 1/2 cup chopped broccoli
  • 1/2 cup chopped carrots
  • 1/4 cup bell peppers
  • 2 small leeks
  • 2 tablespoons olive oil
  • 1 1/2 teaspoons died basil
  • Pepper to taste
  • 1/4 cup crumbled goat cheese
  • 2 tablespoons Parmesan cheese
Directions:
  1. Preheat oven to 350 degrees F.
  2. Combine potatoes, broccoli, carrots, bell peppers and leeks in a square baking dish.
  3. Add olive oil and stir to coat the veggies.
  4. Add dried basil and pepper.
  5. Mix everything together well.
  6. Bake in preheated oven for 55-60 minutes, until veggies are tender
  7. Enjoy!


Here is something new I will be doing with my recipes, providing nutritional facts using www.caloriecount.com.


Clean Eating - The Beginning

0
COM


Well it has happened. I have fallen for a "diet" and I could not be more excited about it!

Looking back at my eating habits over the last several months, I have seen a major decline in the healthy-ish meals and habits I once consumed and maintained. This is largely do to the general increase in "stuff" that I do on a daily/weekly basis. Is that a valid excuse? It doesn't matter, I am using it anyway. The important thing, is that I recognize I am no longer where I want to be health wise and that I need to get back on track quickly.

I have done a bit of research into diets and found most results to be quite discouraging for a vegetarian like myself. I started with the popular ones:
  • Paleo - I am a vegetarian and allergic to most nuts, making this diet very difficult
  • Weight Watchers - I do not want to pay to have a phone app and count points
  • Ketogenic (Atkins, South Beach) - Again the not eating meat thing makes this one difficult
  • Juicing Diet - I like to eat solid food, end of story.
  • Clean Eating - ding, ding, ding! This one makes sense!
Clean eating will work for me because I already know and follow many of the "diet" guidelines. I wrote "diet" because eating clean, as I understand it, is really more of a life change. Here are the guidelines for the "diet" that I am familiar with or currently practice.
  1. I do not eat much processed food
  2. I try not to consume toxins and added chemicals
  3. I eat whole grains -- if the word whole is not there, something has been taken out of it
  4. I never miss a meal -- I enjoy food too much to skip a meal
  5. I try to eat small portions -- but I really enjoy sweets and bread and cheese and vegetables and, well, food
  6. I know I should drink at least 8 cups of water a day -- doing it is more difficult
  7. I know I should eat 5-6 meals a day -- again doing this is challenging
******

This brings me to the point of this post. As I was researching diet options, I realized that most are not geared toward vegetarians or vegans. The clean eating "diet" is really no exception. I read the reviews for the Eat Clean Vegetarian Cookbook, and was surprised to find out that Tosca Reno, does not have a background in nutrition and does not understand vegetarianism or veganism. So here I am, attempting to show other vegetarians how to eat clean. I also do not have the nutrition background, but I understand being a vegetarian, as I have been one since I was 11 years old (that is 16 years). I am going to dive right into this life changing "diet" and I am going to document the progress with recipes, meal plans and my workout routines. I am not a pro, but I will be doing a ton of research, learning as I go, and posting everything for you all to enjoy and hopefully use.

You should know that I will be relying on the following books, blogs and websites to become the healthy person I want to be:
I noticed that having a place to post the wonderful food that I am making encourages me to make more of it! So enjoy and stumble through this lifestyle with me.

Pumpkin Snickerdoodles

4
COM
I am going to start by saying, I have been doing a lot of extra cooking this week! I love it!

Last night, I was making muffins for a morning staff meeting at work. Tonight I am making appetizer type food for an art reception. I am on the Board of Directors at a local art gallery, 1078 Gallery, and tomorrow there is an art reception for one of our amazing volunteers/MFA student/community artist, at which, Board members always bring/donate food items to serve to the guests.

I usually bring bread and cheese, because you cannot go wrong with that! But, I had some left over pumpkin puree from yesterday's muffin baking and wanted to use it up. I was thinking of making pumpkin pie bites, as I made them in October and they were amazing, but stumbled upon this Pumpkin Snickerdoodle recipe from Kitchen Corners and could not pass it up!

Of course, I changed it up a bit. One day, I may actually try a recipe before I mess with it...maybe...
The changes I made:

  • I used more pumpkin -- I feel like pumpkin foods often lack in pumpkin flavor, so I always add more
  • I used whole wheat pastry flour -- I never use regular flour, I always use whole wheat and I always receive compliments on my baked goods. 
  • I used baking powder instead of baking soda and cream of tartar -- They did not flatten, but they taste amazing!! :)
  • I made smaller cookies -- I did this simply to have more cookies to go around at the reception.


Pumpkin Snickerdoodles

Prep Time: 15 minutes
Chill Time: 1 hour
Cook Time: 10 minutes
Makes: 32 small cookies

Ingredients:
  • 2/3 cup pumpkin puree
  • 1/2 cup unsalted butter
  • 3/4 cup sugar
  • 1 egg
  • 2 cups whole wheat pastry flour
  • 1/4 teaspoon salt
  • 1 1/2 teaspoon baking powder
  • 1 tablespoon sugar
  • 1 tablespoon cinnamon
Directions: 
  1. Cream together the pumpkin puree, butter, and sugar
  2. Add the egg and mix well
  3. Add the whole wheat flour, salt, and baking powder, and mix well (dough will be thick)
  4. Cover the mixing bowl and put the cookie dough in the fridge to chill for 1 hour
  5. Preheat the over to 400 degree F.
  6. Grease a cookie sheet
  7. Mix the sugar and cinnamon in a small bowl
  8. Take about a tablespoon of cookie dough and roll it into a ball.
  9. Roll the cookie dough ball in the cinnamon and sugar mixture
  10. Place on the greased cookie sheet, leaving about 3 inches between each cookie
  11. Repeat steps 8, 9, & 10 until the cookie sheet is full
  12. Bake for 10 minutes
  13. Allow to sit for 5 minutes before removing from the cookie sheet
  14. Place on a baking rack to cool
  15. ENJOY!


Yummy, Healthy Pumpkin Quinoa Muffins

0
COM
I love muffins and pumpkins and pretty much anything containing quinoa. So when I stumbled onto this muffin recipe at Fork and Beans, I was quite thrilled to try them out!

Of course, I never follow a recipe to a tee, so the following is my adaptation of Fork and Beans' recipe.

Healthy Pumpkin Quinoa Muffins

Prep Time: 20 minutes
Cook Time: 22-25 minutes
Makes: 8 muffins

Ingredients:
  • 1/2 cup quinoa flour
  • 1/2 cup quinoa flakes
  • 3 tablespoons olive oil
  • 2/3 cup canned pumpkin
  • 1/2 cup honey
  • 1 teaspoons vanilla
  • 1 egg (for vegan muffins use 1 tablespoon flaxseen meal and 2 tablespoons warm water)
  • 1/3 cup milk (for vegan muffins use 1/3 cup hemp milk and 1/2 tablespoon apple cider vinegar -- allow this mixture to sit for minutes before adding it to the muffin batter
  • 1 teaspoon baking soda
  • 1 teaspoon baking powder
  • 1 1/2 teaspoons cinnamon
  • 1/2 teaspoons salt
  • 1/2 teaspoon ground ginger
  • 1/8 teaspoon ground cloves


Directions:
  1. Preheat oven to 400 degrees F.
  2. Combine olive oil, canned pumpkin, honey, vanilla, egg, and milk in a large bowl. Mix until combined.
  3. Add the quinoa flour, quinoa flakes, baking soda, baking powder, salt, cinnamon, ground ginger, and ground cloves to the pumpkin mixture
  4. Grease muffin tin cups with olive oil.
  5. Fill muffin cups 3/4 full
  6. Bake in preheated oven for 22-25 minutes
  7. Enjoy!!

Peanut Butter and Banana Chocolate Chip Muffins

0
COM
Each month at our all staff meeting, someone volunteers to bring a snack for everyone at the meeting. Today, April 3rd, it was my turn to bring a snack to share with my coworkers. I had no idea what to bring. The meetings are at 9am, so I wanted to bring some sort of breakfast food, but I did not want to get to work early to reheat something before the meeting and I certainly did not want to get up early and cook something before work. I settled on muffins. But I could not bring myself to make regular, everyday muffins, so I did some internet research and came up with two great ideas. The first, is below, for the second, please visit Pumpkin Quinoa Muffins (Gluten Free).
******

I found this recipe at Butter Baking, but tweaked it a bit. Below are the changes I made.

  • I used whole wheat flour instead of plain flour -- I never use plain flour and everything always tastes amazing.
  • I used almond meal instead of wholemeal flour -- I wanted to make it a bit healthier, and I think this did the trick.
  • I used 3 frozen bananas instead of 2 ripe bananas -- in my experience frozen bananas lose some of their flavor and I did not have ripe bananas on hand. If you do not have either frozen or ripe bananas, you can use under ripe bananas, just make sure to use 3 of them.
  • I used plain non-fat Greek yogurt instead of regular plain Greek yogurt -- Greek yogurt is the new "in" thing with cooking. This was my first time using it and it is pretty great. But, I do think that regular plain yogurt would do much of the same thing.
  • I doubled the cinnamon -- I just love cinnamon and wanted the flavor to really be present!
  • I left out the milk -- I did not have milk, so I left it out. Everything turned out just fine without it.
  • I did not use paper muffin cups -- I feel these are a waste of money and paper. I never use them, I just coat the muffin tin cups with olive oil before I add the batter.


Peanut Butter Banana Chocolate Chip Muffins

Prep Time: 15 minutes
Cook Time: 15-20 minutes
Makes: 14 muffins

Ingredients:

  • 2 ripe bananas, mashed (use 3 bananas if using frozen or not overly ripe bananas)
  • 2/3 cup non-fat Greek yogurt
  • 1/3 cup natural peanut butter
  • 1/3 cup local honey
  • 1 teaspoon vanilla
  • 1 cup whole wheat pastry flour
  • 3/4 cup almond meal
  • 1 teaspoon baking power
  • 1 teaspoon baking soda
  • 2 tablespoons sugar
  • 1 teaspoon cinnamon
  • 1/4 teaspoon sea salt
  • 1/2 cup dark chocolate chips (bittersweet chips work well too)
Directions:
  1. Preheat over to 350 degrees F.
  2. Combine bananas, Greek yogurt, peanut butter, honey, and vanilla in a bowl. Mix until blended well.
  3. Add whole wheat flour, almond meal, baking soda, baking power, sugar, salt and cinnamon, and mix until incorporated
  4. Mix in 1/2 cup of dark chocolate chips
  5. Coat muffin pan cups with olive oil
  6. Pour muffin mixture into muffin cups, filling each 2/3 full.
  7. Bake in preheated over for 15-20 minutes
  8. ENJOY!
A healthy muffin heart!


The completed snack (minus the orange juice)! How did I do?


Springtime Beauty

0
COM
I went for a walk today and ended up morphing into a photographer. I was just in awe of the amazing spring colors and growth. Let me know what you think.
Meet my pup Gwig.
Some sort of beautiful flowering fruit tree
...maybe.

China Berry Tree growth


My happy pup enjoying her walk and Spring.


Resting in the flowers.
Mulberry Tree growth

The vibrant daisy-like flowers in my front yard


Rosebud!


Grilled Spinach and Artichoke Sandwich

0
COM
For my birthday I received a new Sandwich Press/Waffle Maker. It is pretty wonderful. It has inserts that detach from the machine, allowing it to be extra fabulous and useful for more than one thing!

Of course, I could not wait to use this new addition to my kitchen and I knew exactly what I was going to make, a Grilled Spinach and Artichoke Sandwich! I found the idea for this sandwich somewhere online, probably Pinterest, and have been wanting to make it ever since. The following recipe is what I decided to do with ingredients I had on hand. I have added notes throughout the recipe, on how the sandwich could be improved, it is mostly about the cheese! :)


 Grilled Spinach and Artichoke Sandwich

Prep Time: 10 minutes
Cook Time: 5-10 minutes (it takes closer to 10 without a sandwich press)
Serves: 3 people


Ingredients:
  • 2-3oz of marinated artichoke hearts
  • 3 small handfuls of fresh spinach leaves
  • 1 tablespoon, plain low-fat yogurt
  • 6 slices of bread (some sort of flavored bread. I used Potato Rosemary Bread)
  • Cheese (I used fresh mozzarella and cheddar. I think Havarti, Gouda, or Aged Cheddar would have made this sandwich even better!)

Directions:
This is about the size the artichoke and spinach should be.

  1. Chop the artichoke hearts into small pieces
  2. Chop the spinach leaves into small pieces
  3. Combine artichoke pieces and spinach in a small bowl
  4. Add the 1 tablespoon of yogurt and mix
  5. Take one slice of the bread and place 1/2 of the cheese on it
  6. Spread 1/3 of the artichoke and spinach mixture over the whole piece of bread
  7. Place the other 1/2 of the cheese on top of the artichoke and spinach mixture
  8. Place in the sandwich press and cook for about 3-5 minutes

  9. If you do not have a sandwich press, spray a medium size pan with cooking spray, add the sandwich, and cook the one side for 3-5 minutes over medium heat. Re-spray the pan lightly and flip the sandwich over and cook the other side for another 3-5 minutes.

ENJOY!

Gopher Proof Garden Beds

3
COM
In December my husband and I moved into a lovely rental house. One of the conditions of the move was that we would have an awesome back yard, with a large garden area. I quickly discovered, after we signed the lease of course, that the backyard is infested with gophers. This is awful, as the one to two gophers I have dealt with in the past have taken out many of my plants. Now there are many other issues with the yard, one of them being that the landlord will only let us put a garden in one specific area of the yard, which as of now only gets 3-4 hours of sun...not good enough for the tomatoes and squash I love so much, but I am hoping as the sun shifts, the sunlight will hit the garden area more. But, back to the issue at hand. One issue at time right? I think I have come up with a way to keep the pesky gophers from destroying my plants, without actually causing them any harm or even deterring them from the yard. Essentially, you simply place chicken wire at the bottom of your garden beds. This allows the roots to grow down, but prevents the gophers from getting at the vast majority of the vegetable root system. Sure they will be able to nibble the ends of the roots, but they cannot destroy the plants, if they cannot reach the rest of the roots.

I have dubbed this invention, Gopher Proof Garden Beds. I am quite certain I am not the first to think the following concept up, but I think it is a great idea, and hopefully it works as well as believe it will.

The gopher proof garden bed!

Gopher Proof Garden Beds Tutorial


Purchase Materials:
  • Measuring tape
  • Shovel
  • Chicken wire
  • Wire Cutters
  • Wood 
  • Screws/nails

The space before we got our hands on it. You can kind of see
the sticks we have in the ground, marking the corners for each bed.


Measure and Mark Your Garden Bed Space(s)
After we weeded.
I decided I wanted two small square raised beds and two long thin beds that would not be raised (these two will be for my squash and tomatoes. Both of these grow so large, I did not want them to cast a shadow over or cover my other plants, so I decided to place them in the ground away from everything else.) My husband, Doug, and I went out into our yard, working within the confines of the dim garden area our landlord allowed, and picked out the areas for each of the four beds. We then measured each area and stuck a stick in the ground to mark the corners of each bed.


Weed the Bed Space(s)
This is a tedious process, but it should reduce the amount of weeds you end up with inside the beds later.

One of the 5X5 holes.


Dig the Hole(s)
I decided to make my two square beds, 5ftX5ft and 12 inches deep. This means, that I needed to dig 5ftX5ft hole that was 6-8 inches deep. (The wood will rest on the ground at the 6-8 inch mark and the remaining 4-6 inches will be above ground.)

I also had two garden beds that were not going to be raised. I did not want to dig a 12 inch hole, so I stuck with my 6-8 inch decision and ended up with two 2.5ftX6ft beds that were both about 6-8 inches deep.

I recommend using a wheel barrow for the dirt for each hole. This is something we did not have, and we essentially dug 8 holes after we finished because after we shoveled the dirt out of the hole, eventually we had to shovel it all back into the hole.

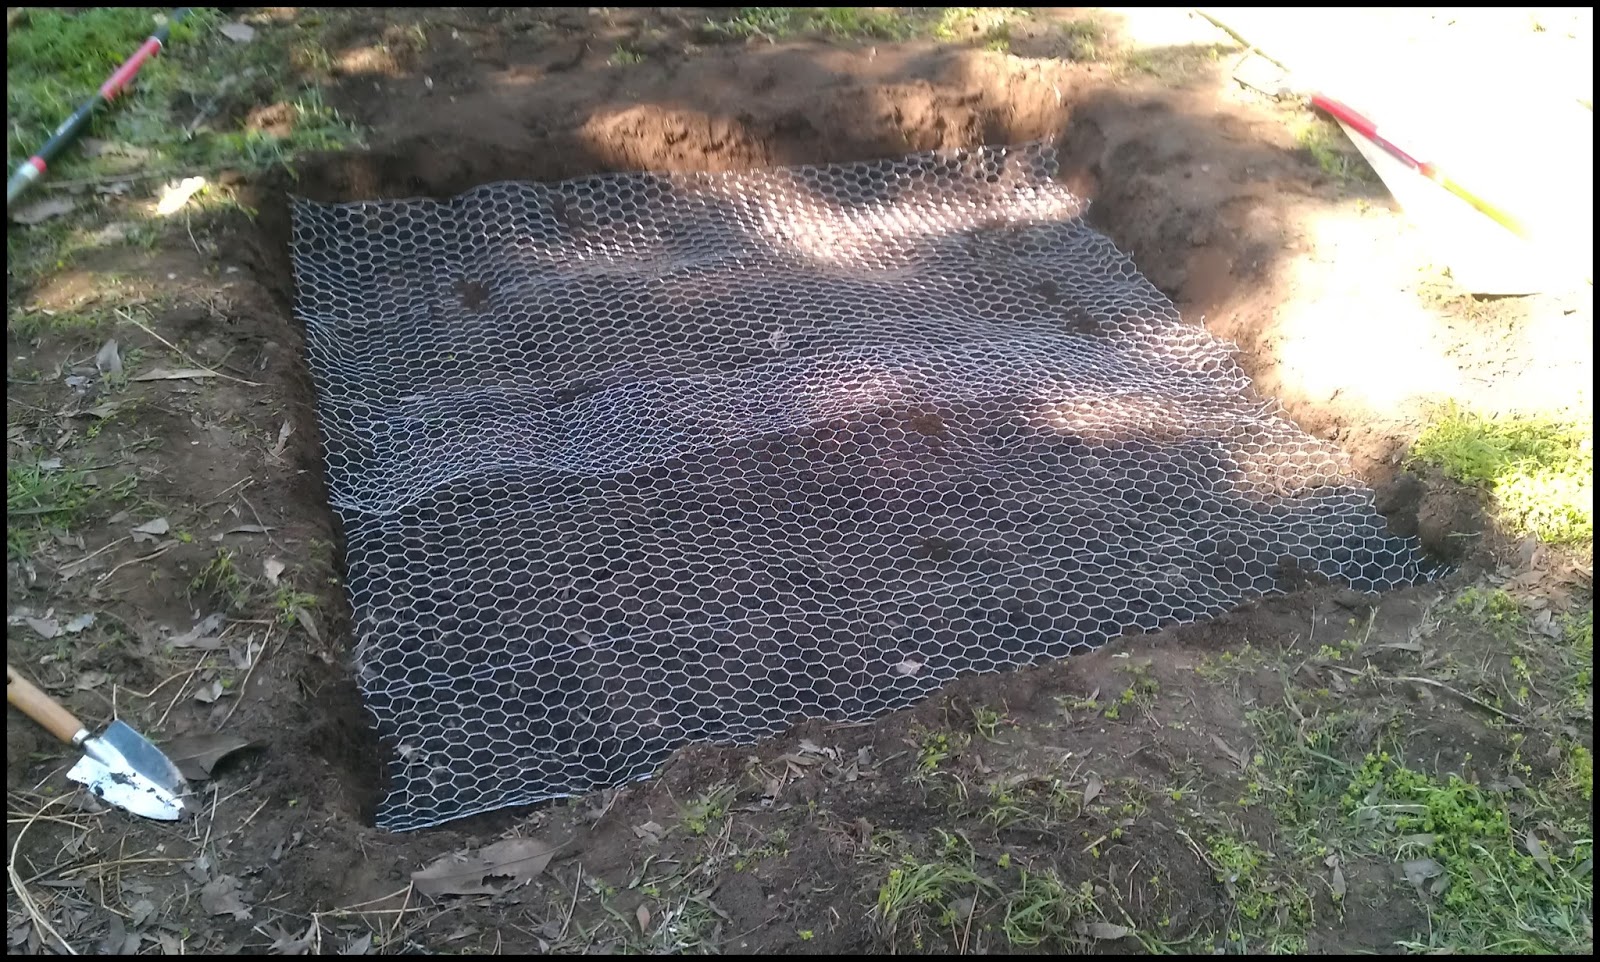
The chicken wire in the 5X5 bed.


Measure and Cut Your Chicken Wire
One of the beds that will not be a raised bed.
The chicken wire I purchased was 3ft wide and 50ft long. I cut two 5ft long pieces. I laid one of these 3ftX5ft pieces in one of the 5ftX5ft holes and then laid the second 3ftX5ft piece next to it. It is okay if they overlap, that is just added protection against the gophers.

I did the same for the second 5ftX5ft bed.

For the 2.5X6ft beds, I cut two 6ft pieces, giving me two 3ftX6ft pieces of chicken wire. I then laid one piece in each hole. It is important that the chicken wire come up the sides of these beds a bit. This will help keep the gophers from entering the bed from the side.

The finished 5X5 bed, without the dirt. :)


Make the Wooden sides of the Raised Bed
I purchased my wood at Home Depot and had them cut it for me. I took four pieces of wood (10inX5ft) and screwed them together (using two screwed for each corner) to create a raised bed.

I repeated the process for the second raised bed.

My new garden. The bed to the right still needs more dirt.
We also cannot dig level beds, but all in all, I think the
gophers will have to be some crafty buggers to get my
veggies!


Fill Your Holes/ Garden Beds with Dirt
This was the fun part, as you really get to see your garden beds come to life - well as much life as there is before you see all the plants emerge!

I am using primarily the dirt from the yard, but I also added a, organic garden dirt and some dirt specifically for raised beds, to help with drainage.

Let me know your thoughts. I plan to post pictures of the garden once it starts growing. Currently the plants are growing in little pots, in an area of the yard that actually gets 6 or more hours of sun. My fingers are crossed that the new beds will get full sun in the summer!

Black Bean and Veggie Enchiladas

0
COM
This is a recipe that I came up with about 9 or so years ago and have been perfecting ever since. I had just moved into my own apartment at the prime age of 18 and I was learning how to cook for myself. I was trying to learn to eat like a healthy vegetarian, and in my 18 year old mind, that meant eating veggies and some sort of protein, in this case corn and black beans. The large amount of cheese and the use of white tortillas did not even phase me...it was a start, but I had no idea what I was doing.

Well the recipe has progressed quite a bit. It is a favorite among my friends and family, although my dad still prefers to add chicken. In all fairness, he will not eat a meal that does not have meat protein in it. Still, everyone who tries them, loves them, and they reheat VERY well, so they make great lunches the next day. I have still not managed to make these enchiladas completely healthy, as cheese tends to detract from healthy eating, but they are much healthier than when I invented them 9 years ago.


Black Bean and Veggie Enchiladas

Prep Time: 20 minutes
Cook Time: 25 minutes
Serves: 4 people (2 enchiladas each)

Ingredients:
  • Seasonal veggies (it changes each time I make them)
    • This time I used:
      • A heaping handful of chopped broccoli 
      • A heaping handful of chopped carrots
      • A heaping handful of chopped fresh green beans
  • 1 can black beans
  • 1 can corn
  • 6-8 oz shredded cheddar cheese
  • 8 tortillas (I used a corn and wheat blend)
  • 1 can/bottle of enchilada sauce

Directions:
  1. Wash and cut the fresh veggies into 1 inch sized pieces
  2. Pre-heat the oven at 350 degrees
  3. Steam the fresh veggies for 5 minutes, or until they just begin to tender
  4. Strain the can of corn and can of black beans in a strainer
  5. Add the steamed fresh veggies
  6. Mix them together in the strainer
  7. Take one tortilla and add some shredded cheese, and a heaping amount of the veggie black bean mixture
Roll up step one: Fold in top and bottom


8.   Roll it up (see pictures to the left for an example) and place in a 9 X 11 baking dish seam side down
9.   Repeat steps 6 and 7 until you have all 8 enchiladas completed (I often do not have room in one baking dish for all 8 enchiladas and use a second, smaller one, for 2-3 of them. So do not be alarmed if they do not all fit. Just use a second dish.) :)
Roll up step two: Fold both side in


Pre-baking enchiladas


10.   Cover the completed enchiladas with the enchilada sauce
11.   Sprinkle the remaining cheese over the top of the enchiladas
12.   Cover the baking dish(s) with tin foil
13.   Bake in a pre-heated oven for 20-30 minutes, or until cheese is melted and sauce is beginning to boil
Finished Product! Enjoy!